5、Hyperf 3 微服务系列 - 构建消费者
hi,我是温新,一名 PHPer
Hyperf 3 微服务代码已上传至 Github:https://github.com/ziruchu/hyperf3-microservice-code
消费者只需要对远程服务进行消费即可。
这里可以对 3、Hyperf 3 快速使用 - Hyperf 3 微服务系列 - 构建 note web 应用项目 创建的项目进行改造,但是了为文章的完整性,这里再重新创建一个消费者。
第一步:创建消费者
创建项目时,只选择时区,其他的都不选。
composer create-project hyperf/hyperf-skeleton note_consumer_user
第二步:安装 JSON RPC 服务及客户端
cd note_consumer_user/

composer require hyperf/json-rpc
composer require hyperf/rpc-client
第三步:server.php 配置文件
<?php
// config/autoload/server.php
'servers' => [
    [
        'name' => 'http',
        'type' => Server::SERVER_HTTP,
        'host' => '0.0.0.0',
        'port' => 9501,
        'sock_type' => SWOOLE_SOCK_TCP,
        'callbacks' => [
            Event::ON_REQUEST => [Hyperf\HttpServer\Server::class, 'onRequest'],
        ],
    ],
],
注意到没有,还是 9501 端口。
第四步:手动创建消费者 - 消费者业务代码编写
1、创建服务消费者接口类
<?php
// app/JsonRpc/Interface/UserServiceInterface.php
namespace App\JsonRpc\Interface;

interface UserServiceInterface
{
    public function createUser(string $name, int $gender);

    public function getUserInfo(int $id);
}
2、创建服务消费者实现类
<?php
// app/JsonRpc/Service/UserService.php
namespace App\JsonRpc\Service;

use App\JsonRpc\Interface\UserServiceInterface;
use Hyperf\RpcClient\AbstractServiceClient;

class UserService extends AbstractServiceClient implements UserServiceInterface
{
    // 定义对应服务提供者的服务名称
    protected string $serviceName = 'UserService';

    // 定义对应服务提供者的服务协议
    protected string $protocol = 'jsonrpc-http';

    public function createUser(string $name, int $gender)
    {
        return $this->__request(__FUNCTION__, compact('name', 'gender'));
    }

    public function getUserInfo(int $id)
    {
        return $this->__request(__FUNCTION__, compact('id'));
    }
}
这样,就已经实现了 rpc 远程调用代码已经写好了,只需要对配置文件进行配置就可以调用了。
第五步:配置消费者
1、配置消费者
<?php
// config/autoload/services.php
return [
    'consumers' => [
        [
            // 对应消费者类的 $serviceName
            'name' => 'UserService',
            // 直接对指定的节点进行消费,通过下面的 nodes 参数来配置服务提供者的节点信息
            'nodes' => [
                ['host' => '192.168.31.90', 'port' => 9600],
            ],
        ]
    ],
];
如果没有 services.php 文件,手动创建一个就好了。
2、配置关系
<?php
// config/autoload/dependencies.php
declare(strict_types=1);

return [
    \App\JsonRpc\Interface\UserServiceInterface::class => \App\JsonRpc\Service\UserService::class,
];
第六步:控制器中调用接口
<?php
// app/Controller/UserController.php

namespace App\Controller;

use App\JsonRpc\Interface\UserServiceInterface;
use Hyperf\Di\Annotation\Inject;
use Hyperf\HttpServer\Annotation\Controller;
use Hyperf\HttpServer\Annotation\GetMapping;
use Hyperf\HttpServer\Annotation\PostMapping;

#[Controller]
class UserController extends AbstractController
{
    #[Inject]
    protected UserServiceInterface $userService;

    // 添加用户
    #[PostMapping('/users/store')]
    public function store()
    {
        $name   = (string)$this->request->input('name', '');
        $gender = (int)$this->request->input('gender', 0);

        return $this->userService->createUser($name, $gender);
    }

    // 获取用户信息
    #[GetMapping('/users/show')]
    public function getUserInfo()
    {
        $id = (int) $this->request->input('id');

        return $this->userService->getUserInfo($id);
    }
}
第七步:测试访问
1、启动 note_provider_user 和 note_consumer_user 服务
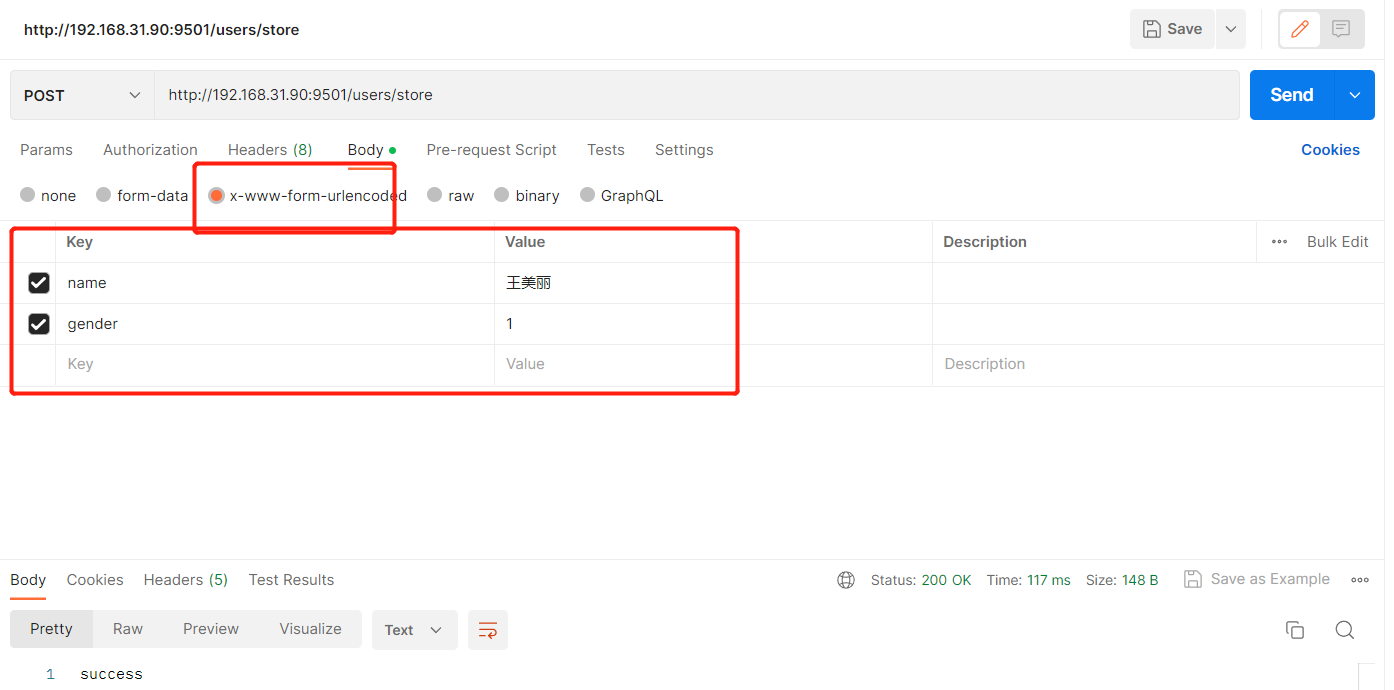
2、使用 postman 测试添加用户,如下图
3、测试获取用户信息
$ curl http://192.168.31.90:9501/users/show?jd=1
{"id":1,"name":"李四","gender":1,"created_at":"2023-03-21 04:37:43","updated_at":"2023-03-21 04:37:43"}
到这里消费者已经完成。下面是对消费者配置进行优化。
第八步:自动配置服务消费者
app/JsonRpc/Service/UserService.php 的作用只是为了构建发起请求的参数和返回结果,hyperf 支持自动配置服务消费者代理类。下面对服务消费者配置进行修改。
1、修改 services.php
<?php
// config/autoload/services.php
return [
    'consumers' => [
        [
            // 对应消费者类的 $serviceName
            'name'    => 'UserService',

            // 【增加 service 配置】
            // 服务接口名,可选,默认值等于 name 配置的值,如果 name 直接定义为接口类则可忽略此行配置,
            // 如 name 为字符串则需要配置 service 对应到接口类
            'service' => \App\JsonRpc\Interface\UserServiceInterface::class,
            // 直接对指定的节点进行消费,通过下面的 nodes 参数来配置服务提供者的节点信息
            'nodes' => [
                ['host' => '192.168.31.90', 'port' => 9600],
            ],
        ]
    ],
];
2、修改 dependencies.php
<?php
// config/autoload/dependencies.php
declare(strict_types=1);

return [
];
第九步:循环生成配置
现在只有一个服务,后续有多个服务,配置起来重复又啰嗦。可以通过循环对配置进行优化。
<?php
// config/autoload/services.php

// 服务接口
$services = [
    'UserService' => \App\JsonRpc\Interface\UserServiceInterface::class,
];

return [
    'consumers' => value(function () use($services) {
        $consumers = [];
        foreach ($services as $name => $interface) {
            $consumers[] = [
                'name'    => $name,
                'service' => $interface,
                'nodes'   => [
                    ['host' => '192.168.31.90', 'port' => 9600],
                ]
            ];
        }
        return $consumers;
    }),
];
如果有新的服务只需要在 $services 数组中添加即可。
第十步:关于异常
看看获取一个不存在的用户,会发生什么?
$ curl http://192.168.31.90:9501/users/show?jd=2
Internal Server Error.

# 服务提供者控制台输出的信息
[WARNING] RuntimeException: 没有该用户 in /www/note_micro/note_provider_user/app/JsonRpc/Service/UserService.php:30
对于这种情况,下篇文件进行处理。
我是温新,本篇文章结束。
请登录后再评论